Replay: OOB WW2 Blitzkieg – Invasion of Poland

I have recently put my hands on this great multi-platform game, now available through Steam: Order of Battle WW2. It nicely refreshes the genre, along the same line as Panzer General and the more recent PanzerCorps for instance.

Fullscreen_11_2_18__6_32_pm.png

The game offers several campaigns, across all the theatres of war, available as DLC via steam. By default, it offers a really good Pacific campaign, but today I want to talk about the BLITZKRIEG one, obviously set in Europe and simulating the beginning of the war with the invasion of Poland and France.

Fullscreen_11_2_18__6_33_pm.png

The whole operation was code named Fall Weiss, or Case White, and consisted in a pincer manoeuvre towards Varsaw, from the North and from the South.

Poland1939_GermanPlanMap.jpg

Screen Shot 2018-02-04 at 4.59.16 pm.png

Like in PanzerCorps, but also more ambitious games such as Hearts of Iron, the campaign part of the game offers the ability to make decisions regarding the effort of war, and where to invest resources in terms of technologies or policies. You can spend specialisation points (SP) which will be acquired by winning battles. Simple yet compelling enough.

Screen Shot 2018-02-11 at 8.55.08 am.png

But we can look at that later, and jump into the first battle, to be welcomed by Field Marshal Von Bock, who briefs us on the assault to be driven towards the Polish capital city of Warsaw. The Army Group North has met a strong defensive position around the town of Mlawa, and this needs to be unlocked.

Screen Shot 2018-02-04 at 5.01.19 pm.png

At the same time, further East, another crossing point of the Orzyc river has to be secured, by taking the village of Chorzele. This will allow all German columns, under the command of x, to head down to the city of Przasnysz, capture its airport, and get one step closer to Warsaw.

Fullscreen_11_2_18__9_13_am.png

Fullscreen_11_2_18__9_14_am.png

As the game starts, the troops on the ground prove a bit thin, given the unexpected resistance, not to mention the absence of significant air support. We have:

  • 3x standard Wechmacht infantry units ’39
  • 1x engineers unit ’40
  • 3x panzer units: A PzKw II and two PzKw38(t) A
  • 1x 7.5cm infantry support gun IeIG 18
  • 1x squadron of Messerschmitt Bf 109 stationed in the northern settlement of Neidenburg

This is clearly not enough to crack through to Warsaw, and we’ll have to count on reinforcements, plus some extra purchases. Turns out I waited until turn 9 to purchase a few more Panzer units, and I should have done that straight from turn 1. Anyway!

This is the video replay of my first stab at this battle.

In conclusion, I clearly mucked around in Mlawa, failing to coordinate the action of my 3 initial Panzers and loosing 2 of them as a result. That plus late reinforcements costed me at least 4 turns to secure the area, and a lot of resource points spent in reinforcements. I could not secure the airport of Przasnysz in a timely manner. Victory was mine nevertheless, and to no one’s surprise, with other primary and secondary goals ticked:

Fullscreen_11_2_18__6_30_pm.png


Replay AEL: Summerian Empire – King level

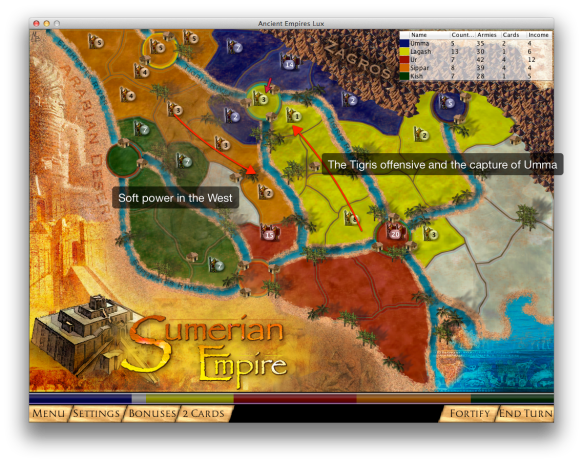
Warming up exercise this Saturday morning: I decide to give a go at a quick Ancient Empire Lux, playing the Sumerian at King level, and choosing the hardest party called Umma (x5 score multiplier).

A bit of background

What’s the situation at the beginning of the game?

  • Umma is the most central city, and thus probably the most vulnerable to attacks from all sides.
  • Umma brings a bonus of 2 points, less than counterparts Lagash (4 points) and Ur (3 points) which already enjoy sizeable armies and controlled land surface.
  • Vast expanses of terrain are owned by the remote mountain city of Susa (White color). They are easy preys and ways to win bonus cards, and they will be bitterly disputed by all players.

Bonus map

Situation at start

So what’s the best strategy here? My proposed short term plan is:

  • Quick wins of land 360 degrees, although favouring the less armoured North, along the Zagros mountains
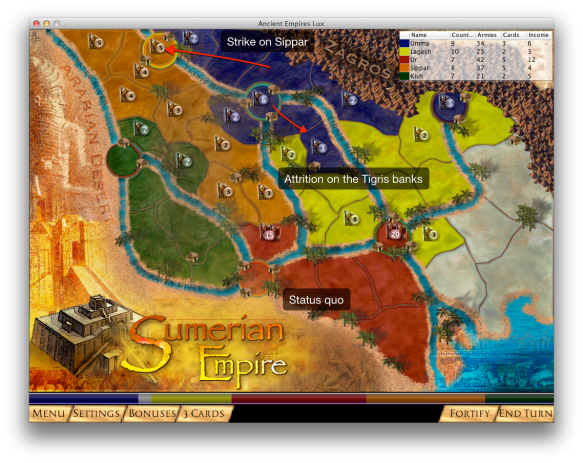
  • Secure the northern-eastern lands thanks to the locking cities of Sipar and Lagash
  • Lagash is definitely a priority target, with 4 points bonus (Sipar and Susa only have 1)

If I manage to do that, I’ll be in a good shape to then regroup and launch an assault to the rich Southlands. Of course, I need to be ready to change my plans based on the random level of aggressiveness of the various opponents.

Turn 2

At the end of Turn #2, I understand that my Western neighbours of Sippar and Kish are relatively peaceful, whereas RED from Ur and YELLOW from Lagash are ruled by imperialistic monarchs. I decide to launch and adventurous scavenger raid behind YELLOW in the Zagros mountains. After a couple of turns it pays off, and I seize the capital city of Susa, enraging YELLOW who counterattacks repeatedly over the next few turns.

Turn 4By Turn #4, a counter-clockwise momentum has built and only my armies find themselves going in the opposite direction and clashing against YELLOW. This is too much attrition for him, and while I keep his troops busy on the frontline, RED cracks into Laggash, his armies marching in triumph in the key city of the Summerian Empire. A fratricide war of attrition begins in the far South, and I decide to hold ground while initiating a campaign in the North towards Sippar.

While the Western nations keep peacefully expanding, after GREEN failing to capture Ur, YELLOW goes into guerrilla wars in the wetlands along the Tigris. His troops reach my capital city of Umma and briefly occupy it. Fortunately, unexpected but timely reinforcement cards allow me to group a large contingent and launch a crucial counterattack to regain the heart of the kingdom on Turn #6.

Turn 6

My plans regarding Sippar have only been delayed, and even if my urban centres are still weakly defended, I decide to take a chance to seize the northern bottleneck city. While still containing recurring assults from YELLOW in the South, I march towards the ORANGE capital to conquer and make History.

Turn 8

Sippar falls like a fruit too mature, to my surprise, and I fail to anticipate the counter attack organised by ORANGE on turn 9, resulting in the fall once again of capital city Umma. Shame on me. My balance sheet could be better: Apart from disappearing GREEN, I’m the weakest nation, at war with 2 others (YELLOW and ORANGE) with limited revenue. In the South, a RED dragon is stirring, successful in his plan to lockup to sectors with 3 cities.

Turn 9

I do not manage to accrue troops fast enough to catchup with the loss I have on 3 different front lines.  Time for a step back and an actualisation of the grand strategy. Determined to regain and never loose again Umma, I also opt for the consolidation of my position, leaving the other Parties to exhaust their wrath on each others. Umma taken back on turn #11, I then spend 3 consecutive turns simply spreading reinforcements and carrying out skirmish operations at my borders. At the end of turn #15, I have secured my 3 blue fortresses with armies of 12 firepower. But a red tide seems to come from the South, and I wonder if ORANGE and YELLOW will be sufficient air bags to absorb the shock.

Turn 15

The good surprise comes from YELLOW who launches a blitz offensive westward through Laggash, Ur and ending up in far away Kish, operation Sharp Sickle. RED is completely taken aback and can only launch a counter strike on Ur to cut the YELLOW snake in two parts. I have the sudden feeling opportunity rings again. My next target is still Laggash and I regroup in the south-east plains for another stab in the back of YELLOW.

Turn 16

The coup pays off, but war rages and reaches another level, with dozen of points gone into smoke at each clash. RED is busy freeing up the banks of the Euphrates, while I fight block by block in the streets of Laggash. Best news for today is that there will be no cooperation between YELLOW and RED, and I’m free to launch operation “clean-sweep” out of Susa to send un-supplied remnants of RED and YELLOW armies routing in the swamps. By turn 18, phase 1 of my initial plan is finally complete!

Turn 17

By early turn 19, YELLOW is a mere memory and a lame mention in school manuals for the free people of the South. But the RED tyranny in Ur still mobilises masses, and logically a strong contingent is sent to kick out the autocratic RED regime from the antique city. The northerners leave a peaceful life, behind the inexpugnable walls of the Tigris citadels (30 firepower each). BLUE as just become the new super-power. But Armageddon is in the making in the outskirts of Kish, where RED shows all his madness and lack of strategic acumen.

Turn 19

With Ur taken and RED’s inability to call the fortune cards before the gates of Kish, we see the collapse of a RED clay giant, his armies roaming aimlessly in the central plains, suffocating without re-supplies. Our next stop is Kish, which falls by turn #20, signing off the absolute end of the YELLOW empire. Treasures are accumulating in the King’s halls of Umma and Ur, and money flows to pay countless Blue armies now.

Turn 20

On the morning of turn 21, river birds stop singing and large mammals desert the central grasslands, as we launch operation Typhoon to pacify the area occupied and looted for years by the evil troops of ORANGE. This all happens overnight, leaving only rogue bands of RED to clean up in the far North.

Turn 21


The game is won in 2 more turns, for a total of 24, leading to a score of 12,570. Please let me know if you manage to significantly beat that, I’d be interested to know.

Turn 23


Victory

25 years of Strategy & Tactics for just $20?

Hi peeps, back this morning onto the Australian Wargamer blog, which I have completely let down over the last few months, completely sucked into the black hole of my new career. No good excuse for sure, and I do apologise for those I have left disappointed by not replying to their comments or enquiries, shame on me.

Never to late to do some good, and my first action is to catchup with the latest updates from the industry. As I browse through my subscriptions, I realise it’s about time to become a faithful and regular reader of Strategy & Tactics, the legendary publication from Decision Games. In a few clicks I pay the fee for the next 24 months and I’m about to check out when I notice the “Premium Subscription” offer. A bit curious and greedy, I check this out to discover in awe the Holy Grail I have been looking for for decades: The ability to get access to the (almost) complete collection of S&T back issues, yes nothing less.

The publisher offers to go back in time up to issue #128, dated …. late 1989! Already a bit numb, I get completely stunned when I discover the ridiculously affordable cost for such a privilege: $19.95 … yes TWENTY US DOLLARS to skim through the precious pages accumulated over the last quarter of a century by one of the most iconic wargaming journal and prolific authors.

I bless the day, and start downloading. So should you do too!

Strategy & Tactics Premium Subscription and Library

Replay iBattle Academy – Western Desert Campaign 1

The Western Desert Campaign is the first one available in Battle Academy for iPad. One will argue that this game is not the most realistic simulation one can find about WWII at tactical level, and that’s fair enough. But what an awesome lot of fun to move troops across the dunes and villages on a tablet!

Western Desert Campaign

Mission #1 is titled “Capture the fort”, and it is some sort of tutorial set up involving just 3 AFVs and a couple of squads, whose mission is to take control of an isolated Italian fort. I love these briefing screens:

Capture the fort - Briefing

Capture the fort - Tactical map

The interest here will be to tick the 3 proposed achievements:

  1. Do not lose any units (probably the hardest one)
  2. Kill at least 10 enemy units
  3. Capture all victory points in 12 turns

So let’s get started! No option to configure your army here, you’re just offered the default 3 “Queens of the desert” aka Matilda tanks. A couple of Bren carriers full of tommies will come along a bit later, to help securing the buildings.

OOB and Achievements


Turn 01


I launch my platoon of reco tanks at full speed along the trail, and on turn two they spot their first column of italian tankette, which turn out to be CV33 or L3. The Matildas easily deflect the rounds of machine-guns, and in a snap I have blasted the first two in the column down to hamburgers. The 3rd one will face the same doom minutes after, hammered by my off-board artillery.

Turn 02


Pushing forward, I encounter some opposition in the rugged terrain around the road, where italian footmen have taken cover during my artillery barrage. These crags are indeed the ideal cover in barren lands, I should be mindful of them later on.

But resistance is futile and I bypass the obstacle to meet another column of brazilian tankettes. Meanwhile, my infantry is catching up, riding fast on the priceless Bren carriers. Stupid me! There was another italian squad hidden on the opposite slope of the valley. They were quiet so far because suppressed, but now they show up for a last hurrah. The tommies have to disembark for a surgical cleanup, while the Matildas teach english to their italian counterparts. In the bloody battle, I loose one of my squad, which is taking one achievement away, damn!

Turn 05


Finally, we are reaching the settlement and the fort, which looks dangerously quiet. No doubts there are some machine guns ready for an opportunity fire behind these dark windows.

Turn 06

Using Assault movement, I scout around the buildings, to spot some jerrys entrenched in the building on the outskirts. The tommies carry out a merciless assault and take ground. Good surprise, more reinforcement are coming, 3 more squads to support the final assault. Although they’ll take 3 turns to reach the settlement, in the absence of proper transport.(And now I realise I should have sent my empty Bren carrier to accelerate deployment). As there’s no signs of life, I decide to call for another artillery barrage, hopefully to suppress the last defenders.

Turn 08


My AFVs circle around, with a hope to take them aback, while infantry comes closer to the city wall, and capture another outpost.

Turn 09


We finally spot the last defenders and HQ officers trying to flee from the back of the fort. They are snared in a snap, and we claim victory on Turn 11!

Turn 10


Victory

PocketTactics: Battle of the Bulge announced

Bulge by SPI in 1979Battle of the Bulge is one of these legendary titles that have founded modern wargaming and changed the life of the young boardgamer I was in the 80’s.

Initially published by Avalon Hill in 1965, it has been then replicated, duplicated, and reissued countless times by the most prestigious publishers, both on cardboard and on PC screens.

There were certainly some serious opus along the way, and any serious wargamer should have in his library Bulge released by SPI in 1979.

Battle of the Bulge for iPadAnd when you hear that one of the grognards from SPI, Eric Lee Smith, decides to start a new venture named Shenandoah Studio to port the game on tablets, starting with iPad, you can start believing again in Santa!

The game should be available on the appstore this September 2012, so keep an eye on the developer’s diary. We’ve been able to grasp some screens and game arts here and there on the web, and it just looks awesome, nothing clumsy or clunky anywhere, this is all beautiful and polished and we just need now to assess the gameplay!

Battle of the Bulge - Game interfaceBattle of the Bulge - Game interface

This is great news for all grown up pocket gamers. Add on top of it that the next battle using the system is already planned for 2013-Q1: Get ready to fly to North Africa, to meet Rommel at El Alamein. That will be Volume 2 of this new game series titled “Crisis in Command”. It’s a wonderful world.

El Alamein announced!

Eric Lee SmithProject’s video inspirational pitch by Eric himself: http://kck.st/I5cHzt

Eric Lee Smith is a game designer and software development specialist. He worked for both Avalon Hill and SPI (Simulations Publications, Inc.). Most of his games were published by Victory Games (I), a subsidiary of Avalon Hill formed around ex-SPI employees. In 2005, he became Vice President of Product Direction for Investor Force Incorporated.

Battle of the Bulge – Very early interface preview